Monday 3 October 2011

Final 10 Images Theme 1

My inspiration for theme 2 came from a mixture of sources as shown from my research, I particularly liked the work of Mario Testino as I felt he was able to capture the persons personality and feeling in the images.   I like the style of Magnum and Venture photography, contempory portraiture photography - magical realism.   In the images below I have also tried to do this.


The image above captures the facial expressions of being mesmerised at a stunt show.  Deep in thought.  The main focal point is the face whilst the background has been deliberately put out of focus to emphasise the facial expressions.  Lighting conditions were good and the image is about shapes and capturing the feeling of the individual at that moment.


For the image above I choose a low viewpoint for a different perspective on the individuals.  I tried to keep the fun aspect alive by capturing them from the low viewpoint, this alters the perspective of  the subjects and they appear taller than they actually are like an optical illusion.  The main focal point is both individuals.  This image is more about lines and colour and perspective.  Your eyes are initially drawn to the individuals feet and then up through the image to their faces.


This image is similar to the one above but from a different view point of front facing.  The main focal point id the boy. The intention of the image was to capture the sibling relationship between a brother and sister.  This image is about shapes, colour and forms.  The composition of the image with the boy being brought more into the front of the image helps to add the feeling of sibling rivalry with him being the cheeky bossy one.


Using quick shutter speed I captured the fast moving swing.  I like this image as it is fun and capture the excitement on the individuals faces.  The image composition is filled with the individuals again this image was taken from a low viewpoint to help to create the height of the swing.  The background gives the impression of layers with the bark and then the grass with the cloudy sky in the top half of the image.  The background has been put slightly out of focus with a  mid f stop used. It is about lines and shapes and colour.


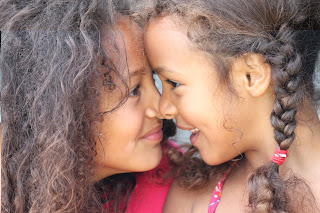
I chose the above three images as the images capture the mood and feeling and expression of each individual.  The top two reflect the style of Mario Testino as the individual isn't looking directly at the camera.  The viewpoint and composition has been kept simple to allow the focus and emphasis to be on the face and eyes.  The hair in the top two add texture and interest.


This is one of my favourite portrait images because it evokes a feeling of fun and happiness.  The individual has been kept in focus whilst he sea in the background is out of focus to allow full impact of the individual.  I got her to jump up and down to try to reflect the influence of Frederich Seidensucker.


A similar shot but with a different feeling I also took the image from a different angle to make it more interesting.


This image I think captures the innocence of childhood.  It shows good use if the rule of thirds and composition.  Again this image being influenced by both Mario Testino and also the contemporary feel of Venture photography.  This was taken from a low perspective.   

Monday 26 September 2011

Final 10 images Theme 2


The image above was chosen for the texture.  I was inspired by the work of Joe Cornish and Charlie Waite to look for interestng natural beauty shots.  This particular image was one of my favourites as the lighting is good and I liked the way I set up one rook to contrast against the other rock in the background it has something interesting in each third of the image and your eye is drawn through the image due to the out line and detail of the rock. The sea contrast offers softness in the background.


The seaacape image above was chosen as it shows use of shutter speed.  The image gives a sense of calm.  The seaweed in the foreground leads your eye into the image and then over to the jagged outline of the rock.  Although the image lacks colour there is again alot of texture through the movement of the sea and the rock.


I became a little facinated by the rocks around this area whilst taking the images above.  Charlie Waite describes lines shapes and sharpe burst of colour one of his videos. I decided to take a close up of the cliff face using a higher F stop to keep everything in focuse.  I like the line formations on the rock.  The randon greenery softens the image.  I could have improved the image by enhancing the green and yellow on the plants on the rock.


I chose this image as it offered a different viewpoint to my other chosen images.  It was taken from the bottom of the cliff face looking up. I like it could as it could almost be mistaken from being taken from a low viewpoint.  The releflection on the rockface enhances the texture of the rock and makes it appear wet.

Charlie Waite inspired me to try this image.  It has a mysterious feel about it and your eye is drawn into the image to look over the top of the hill.  It wastaken from a low viewpoint.  I wanted the image to be moody.  The grass offers texture to the image whilst the main focal point is the brow of the hill.


I liked this image as it captures the grandness of the cliff against the small island that had previously been photographed.  A high F stop was used to keep all of the rock face texture and detail in focuse.  This particular one intrested me as the rock offered a jagged horizon line against the smoothness of the sand.  I spotted the footprints in the sand and thought that this would add interest to the image.  The light conditions allowed me to pick up the colours in the rock and add warmth to the image as does Joe Cornish and Ansell Adams their work.  I like the way that the sky is simple with no cloud as it does not add a distraction to the cliff face.


I liked the simple compostion of this image picked up from my research and the lines of the brows of the hills.  The tree is almost silouted againt the blue cloudy sky.


This image is about shapes and lines.  The contrast of the plush green leave against the dry textured log creates interest.  I took various angles of this leaf but liked this one as the main focal point of the image was the shadow which I kept in focus to keep the leaf shadow sharpe. 


One of my favourite close ups.  The leaf being the main focal point with the the brightly coloured berries out of focuse.  The lighting conditions was good for this image was as there was no direct sunlight however I kept the light flow behind the leaf to emphasise the detail on the leaf.  the composition is simle but effective.  This type of image would look good on a canvas.


The stillness and tranquility of the image captivates me.  Ansell Adams completed some work of the snake river which can be likened to this image.  This image is about lines and texture.  The bridge being the main focal point, however it wa important to keep the whole image in focus to acheive the feeling of the image.  I like the way you can see the lines on the hills in the background.  It was a shame there was a slight breeze as it would have been good if the lake could have appeared glass like with reflection.

Saturday 24 September 2011

Landscape Photography presentation - Canvas Gallery Wrap Prints by Jim Crotty


Matting is not necessary if you are choosing to put your images onto canvas.  This is a current popular way to display images in peoples homes.

Friday 9 September 2011

211 - Presenting photo Images

Theme 1 - Presenting Photo Images


The target audience for portraiture photography could be:
Families 
Couples
Models
magazines 
catalogues 


There are many ways to present your images however the most common ways that portraiture may be presented is by portfolio, blog, websites, magazine spread, photo image book, framed individual shots, canvas, saved onto cd, press.


When presenting portfolios whether in blog format or a paper based..You must think of your audience if your target market in newly weds then only include the bridal type images and the grandness of stately homes dont have random images of mountain biking!  If it is a paper based portfolio the images may need to be sent to  photo lab who would do the calibration of the colour of the images.  The images need to be printed on high quality paper for example:


Fuji Crystal Archive Professional Super Type PD Luster
A professional colour paper.  Print outputs result in a more vivid colour reproduction and improved highlight detail.  ProDPI obtains the highest DMAX and brilliant whites resulting in a clear crisper image.

Fuji Crystal Archive Pearl Paper
Developed for digital output.  Pearl paper produces high quality glossy digital prints with a pearl like appearance.  This paper is ideal for professional or commercial work like fashion images.


Fuji Crystal Archive Professional Deep Matte Paper
This paper gives a true matte finish.  Not recomended for images with dense shadows or rich blacks.  It offers bright white and good colour range with subtle warmth.  Great for soft light images and skin tones.

Kodak Endura Metallic Paper
Its gloss finish creates images with unique visual interest and depth.  It creates rich vibrate tones and flattering flesh tones which is ideal for wedding images and also great results for commercial photgraphy.


Photo labs that could complete this professional work are
  • Uk.whitewall.com
  • www.theprintspace.co.uk
  • www.digilabpro.co.uk
The photo labs can offer many services Professional colour management, resizing without loosing the quality and sharpness of the image, cropping, adding borders that enhance the images, different finishes to the final images as shown above. Photo labs will be more costly than using your local high street store however you need to think about the impact of the final images and the customer audience that you are trying to capture.  Photo labs are able to present images on a variety of materials: canavas paper, metal, jigsaws, blankets.

An alternative that is available are the easily accesable high street stores boots, Kodak gallery, Snapfish.  Many of these now allow you to complete your choice of presentation online.  Again they can put your images in a range of formats jigsaws, calenders, posters, plates and mugs.  They may be cheaper than the photo labs however you need to consider your target audience and the final image output you would like to achieve.


For my portfolio images I would display them in a web based portfolio as an exhibition source.  The reasons for this is the low cost elements and also the fact that the web has a global audience.  The images will not loose there quality whilst being viewed.  My work will be interactive to the viewer and could incorporate sound and even video if required.  The viewer would have a better experience that does not consist of still images that could degenerate with age, it creates a different relationship between audience and image.  It means that the web based portfolio is portable and up datable.  I would also consider a power point presentation for locations that do not have internet access. A photo book would also be good to allow viewing of the different papers and effects that would be available for chosen images.  

Theme 2 -  Presenting Landscape Images

To achieve full impact of a landscape image they need to be professionally prepared ready for display in exhibition.  Although as with portraiture photography the images could be displayed web based in a blog or web based portfolio for accessibility purposes, storage may also be be on dvd or data stick on power point presentation.  Many high street shops display canvas landscape images.   

Matting the images protects the images once it has been framed. It will make the images more sellable as customers can then chose the framing they would like for the image to suit the environment it will be displayed in.  By matting the image you are also provides the images with its own space and uniqueness. 

Matting
Matting is when you mount the image onto a matt board which has an opening the size of the image.  You attach the image to the back of the board and seal it with archival tape.  Popular size frames are 8x10, 11x14,16x20,20x30.  Obviously the larger framing sizes are better for displaying the landscape photography. Matting is available both professionally and you are also able to do it at home.  If you were to do it at home or in the early stages of setting up you could source these tools which are relatively cheap.  On the left is the Dexter Matt cutter and the tool in the right shows a more professional tool the C&H Advantage Pro Table Matt cutter.


The choice of frame is important there are many differnet effect available.  Some make the images jump out of the wall or some will sit flush - is the frame plain this would be good for an image with a considreable amount of color so it jumps out.  It the image modern perhaps metal framing or is it oldy worldy,a rustc wooden frame may enhance the images feeling  The frame must complement the image and not cause a distraction the glass in the frame needs to be anti reflection or consider where the image is positioned - not in direct sunlight.  Think about the frame sizes that will be needed, the images might need resizing by a photo lab.  To prepare for an exhibition requires alot of preparation and planning.  You need to also consider your exhibition launch  material, exhibitions can be expensive and of course the hire if the venue.

I would display my landscape images by having them professionally framed after being mounted.   Some would also be out onto canvas but I do feel depending on the image canvas can sometimes loose the image quality. I would something simple like the frames below with a neutral background:


Tuesday 30 August 2011

Wales:Theme 2 Natural Beauty


Visit to Wales:

Plan to take landscape image for Theme 2 with the influence of Joe Cornish and Charlie Waite influence.  Look for uneven edges, shapes and texture.

Equipment required for shoot
Camera Canon EOS 500d
Light reflector
Tripod
Lens - 70-300 telephoto zoom
Lens - 18-55 zoom


Wales: Theme 1


Visit to Wales:

Plan to take portrait image for Theme 1 with the influence of Mario Testino style.  Look for jagged edges and texture.

Equipment required for shoot
Camera Canon EOS 500d
Light reflector
Tripod
Lens - 70-300 telephoto zoom
Lens - 18-55 zoom


There was no particularly dangerous equipment involved in taking the images, however I needed to be aware of the times that the tides came in and out because of the rocks only being available for use when the tide is out.  Also there may be area of quick sand.


Thursday 18 August 2011

Joe Cornish - Theme 2, Natural Beauty

Joe Cornish is a current landscape photographer. He was born in 1958 and originally studied art at Reading university where found out he was drawn to photography. I found Joe's work interesting as his early work was of his travels around the globe which featured landscape photography. This was accepted to be featured into Charlie Waites gallery a photographer I have also researched and found to be inspiring. I found Joes work inspiring as his work is about the wild untouched part of nature and the simpleness of the countryside that's beauty often is forgotten. 


This particular image inspired me to recreate the image shown below.  The day chosen was not misty unfortunately when I reached the focal point.  The image main focal point in the image is the tree.  Although the image above is shot from a higher focal point.  I chose to have the tree peeping over the top of the hill to make a bigger impact and shoot from below.  The image is about texture and form with the trees outline standing out clearly with the mist in the back ground.  The tree draws you into the image and makes you look beyond into the background.  In my image the tree draws you to the image and then your eye follows the line and shape of the hill.


I was instantly attracted to the image below as I love waterfalls.  The image would have been shot using a slow shutter speed and a tripod to make the water look magical and flowing.  I am a little torn between the main focal point being the bush or the waterfall.  For me the way the image is composed are my eyes are drawn to the waterfall at top and then move down the image.  There is something to look at in each third of the image so is balanced nicely.  The image shows texture.  It is shot from a low perspective shot.  In my image I also shot from a low perspective point.  As the water was not quite as fast flowing as the waterfall captured by Joe Cornish I decided to compose the image with the outline shape of the hill in the background to create further interest.  In my image your eye line flows in the opposite way and goes from the water at the bottom to the shape and form off the hills meeting in the background.  Again my image is about texture and movement.  Note to ones self to find a proper waterfall for better impact.


The image below also inspired me to create the image above.  My image lacks the richness of colour that has been created in the image below by the trees.  It shows texture and form.  It feels a little enchanting.


The landscape image below first although appears very simple when you look closer has alot going on.  There is alot of texture and pattern in the image and good use of light from the clouds.  I think it must have been a little windy as the long grass has been captured being blown to the left.  High perspective shot which gives you the feeling of being free.  Nice use of gentle colour which highlights the different textures in the image.


This image inspired to me take images showing texture but from a low viewpoint rather than being ariel.